Shivering:Rotten Den
|
|||
|---|---|---|---|
| # of Zones | 5 | ||
| Occupants | |||
| Zealots, Shambles (2 boss-level Zealots, 1 boss-level Shamble) |
|||
| Important Treasure | |||
| M'desi's Skull 3 boss-level Chests 1 boss-level Hollowed Stump 2 Hollowed Amber Limbs 1 Hollowed Amber Stump 2 Madness Ore Deposits |
|||
| Console Location Code(s) | |||
| XPRottenDenExterior, XPRottenDen01, XPRottenDen02, XPRottenDen03, XPRottenDen04, XPRottenDen05 | |||
| Region | |||
| Dementia, [-1,-9] | |||
| Location | |||
| South of Fellmoor | |||
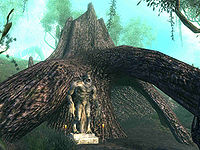
Rotten Den is a large cave south of Fellmoor and west of Xedilian containing Zealots and Undead (quest-related). It contains five zones: Rotten Den, Deadfall, Rotten Den, Precipice, Rotten Den, Sanctum, Rotten Den, Hollow, and Rotten Den, Encampment.
Related Quests[edit]
- Ghosts of the Hill of Suicides: Help free five wandering souls.
Notes[edit]
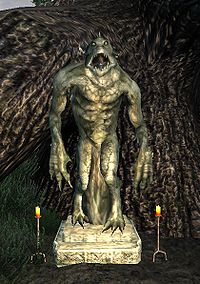
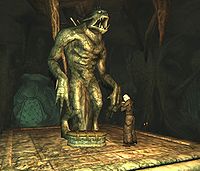
- A large scalon statue can be found just left of the entrance
- This cave contains 17 Fungus Stalk plants, 5 Thorn Hook plants, 44 Root Stalk plants, and 49 Withering Moon plants.
Exterior[edit]
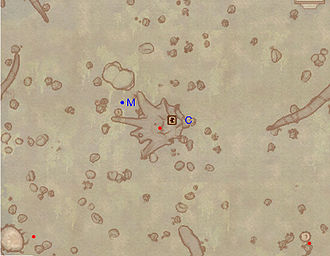
- The exterior is located at coordinates: SEWorld -1, -9
- This location's map marker (M on map) is named Rotten Den. The entrance door is ESE of the marker, 70 feet away.
- 1 Zealot Enemy (at level 9 or higher, 25% chance Flesh Atronach, otherwise Zealot) is near the entrance
- 1 Gnarl (Dementia) is near the entrance
- 1 Wilderness Creature (Shoreline variety; Dementia) is near the entrance
- The following plants can be found near the entrance: 3 Fungus Stalk plants, 2 Letifer Orca Planta plants, and 8 Mushroom Tree Sapling plants
Zone 1: Rotten Den, Deadfall[edit]
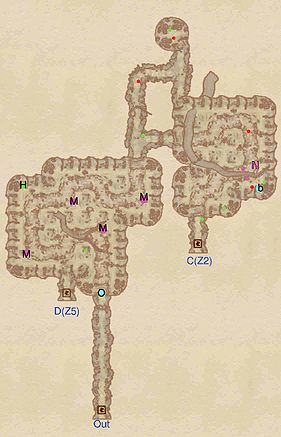
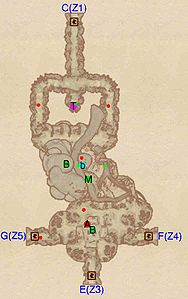
Upon arriving from door Out, the sight of a dead Treasure Hunter at O serves as warning about the difficulties ahead. In the first room you will have to run through a canyon-like path as Scalon Statue traps shoot down at you from an upper level. Luckily, only four of the fourteen statues at M will actually shoot and they can be avoided by carefully timing your run. Loot the minor loot chest at the intersection and then take the northern passage. This will take you to the upper level of the second room, with the possibility to snipe at a patrolling Zealot below. Along the way you will face two more Zealots and come across another minor loot chest. None of the Statues here will shoot at you, so you can easily make your way southeastern corner, where a Zealot guards a bedroll (b) and two minor loot chests. Jump down into the canyon and avoid the Root Spike traps at N to reach a minor loot chest and the door (C) leading to Rotten Den, Precipice.
You may return to this zone from Rotten Den, Encampment through door D, at which point you will find yourself on a higher level of the first room. The statues cannot bother you up here, so loot the Amber stump at H before jumping down to proceed to the exit.
Occupants:
- 2 Zealots
- 2 Zealots (always best possible level)
Treasure:
- 1 Hollowed Amber Stump (1-4 Amber; non-respawning) at location H on map
- 2 Chests (1 locked)
- 3 Hollowed Stumps (Healing)
- 1 Urn
- The following plants will always be found: 7 Root Stalk plants and 17 Withering Moon plants
Traps:
- 4 Scalon Statue traps at location M on map
- 2 Root Spikes traps at N
Doors and Gates:
- There are three doors in/out of this zone
- 1 door (at Out) is the only door connecting with the outside
- 1 door (at C) leads to zone 2, Rotten Den, Precipice
- 1 door (at D) enters from zone 5, Rotten Den, Encampment
Other:
- 1 Dead Treasure Hunter (carries light armor, one weapon, unenchanted loot) at location O on map
- 1 bedroll at b
Zone 2: Rotten Den, Precipice[edit]
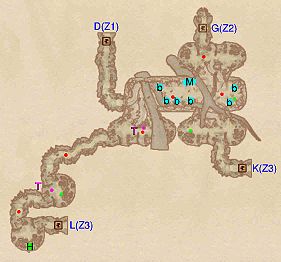
As soon as you enter, you will be under fire from a Scalon Statue at T, under which you will find a hollowed stump, and will also likely be attacked by the two Zealots patrolling nearby. Head left if you want to snipe at a Zealot perched atop a rock near a tent, a bedroll (b) and a boss chest (B). Drop down to loot the Madness Ore at M before heading toward a large, peaceful Scalon Statue set on a stone foundation. Take care, there are three Zealots ahead, one of whom is boss-level (A) and can usually be found praying at the statue just next to the boss chest at B. Head up to a raised area where you can access three other zones: Rotten Den, Hollow (door F); Rotten Den, Sanctum (door E); and Rotten Den, Encampment (door G).
If you are just here to get M'desi's Skull for the quest Ghosts of the Hill of Suicides then head directly through door E to the Sanctum. If you're here for a more thorough exploration of Rotten Den then continue through door F to enter Rotten Den, Hollow.
Occupants:
- 1 boss-level Zealot at location A on map
- 5 Zealots (always best possible level)
Treasure:
- 2 boss-level Chests (Zealot variety) at locations B on map
- 1 Madness Ore Deposit (1-4 Madness Ore; non-respawning) at M
- 1 Chest (locked)
- 2 Hollowed Stumps (Healing)
- The following plants will always be found: 11 Withering Moon plants
Traps:
- 1 Scalon Statue trap at location T on map
Doors and Gates:
- There are four doors in/out of this zone:
- 1 door (at C) leads to zone 1, Rotten Den, Deadfall
- 1 door (at E) leads to zone 3, Rotten Den, Sanctum
- 1 door (at F) leads to zone 4, Rotten Den, Hollow
- 1 door (at G) leads to zone 5, Rotten Den, Encampment
Other:
- 1 bedroll at location b on map
Zone 3: Rotten Den, Sanctum[edit]
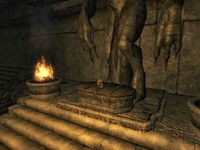
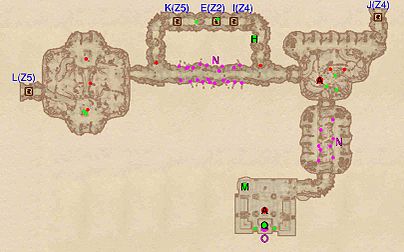
You may enter the top level of this zone from either: Rotten Den, Precipice (door E), Rotten Den, Hollow (door I), or Rotten Den, Encampment (door K). A short tunnel connects all three doors; a hole in the floor leads down to a lower level. If you drop through this hole your only exits from this level will either be through door J or door L. It is necessary to drop through this hole to thoroughly explore this zone.
Dropping through the hole from the top level you will land on a floor with two more holes leading down to lower levels:
- The Western Hole leads down to a short tunnel with a hollowed stump and another hole in the floor. You must choose this hole to get all the loot in this zone.
- The Eastern Hole leads down to a short tunnel that is empty except for another hole in the floor. You may avoid some traps by choosing this hole.
Both holes lead down two levels to the bottom level of this zone where the two descending paths join together again.
If you choose the western hole be sure to loot the hollowed stump on the next level (green dot on the map between doors K and E). Dropping through the last hole you will find yourself on the lowest level, north of an intersection with a tunnel that leads either east or west. To get the best loot on this level go left (east) through the first group of Root Spike traps (N). At the next intersection go left (north) a short way to find a Hollowed Amber Limb at H, guarded by a Shambles. Looking up you will see the hole through which you would have arrived on this level if you had chosen to descend through the eastern hole rather than the western one. Return to the last intersection and continue left (east) through a root door to enter the northeast room.
Here you will find many coffins overgrown with roots guarded by three Shambles (including a boss-leveled one at A). A root ramp leads up to the northeast corner where you will find the door (J) to Rotten Den, Hollow. Alternatively, a tunnel leads south through a canyon-like path full of Root Spike traps (N) until it reaches a stone wall. Jump through a hole in the masonry to access the final room, where you will find a Zealot Matriarch (A) and a Scalon Statue trap (O) guarding a Madness Ore deposit at M and a boss chest (Q). On top of it you will find M'desi's Skull sits atop a boss-leveled chest at Q.
Return to the northeast room and decided whether to exit this zone through door J or to continue west and exit through door L into Rotten Den, Encampment. Should you choose this latter option, you will again need to navigate pass a series of Root Spike traps to reach the far western room where you will find door L as well as three Shambles and two minor loot chests.
Occupants:
- 1 boss-level Zealot in the southern room at location A on the map
- 1 boss-level Shambles in the northeast room at location A
- 2 Shambles
- 5 Shambles (always best possible level)
Treasure:
- M'desi's Skull in the southern room at location Q on the map
- 1 boss-level Chest (Zealot variety) also at location Q
- 1 Hollowed Amber Limb (1-4 Amber; non-respawning) at H
- 1 Madness Ore Deposit (1-4 Madness Ore; non-respawning) at M
- 3 Coffins 01
- 2 Hollowed Stumps (Healing)
- 1 Urn (Healing)
- 2 Urns (Healing)
- 1 Urn 02
- The other following items will always be found: 2 Madness Ores
- The following plants will always be found: 17 Fungus Stalk plants, 8 Letifer Orca Planta plants, 4 Root Stalk plants, and 10 Withering Moon plants
Traps:
- 29 Root Spike traps at locations N on map
- 1 Scalon Statue trap at O
Doors and Gates:
- There are five doors in/out of this zone
- 1 door (at E) leads to the zone Rotten Den, Precipice
- 2 doors (at I and J) lead to the zone Rotten Den, Hollow
- 2 doors (at K and L) lead to the zone Rotten Den, Encampment
Zone 4: Rotten Den, Hollow[edit]
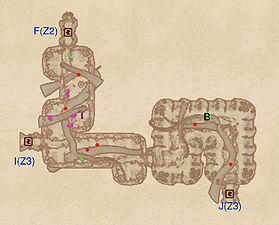
This zone is basically one winding chamber patrolled by Shambles. Upon arriving from Rotten Den, Precipice via door F, loot the hollowed stump under the ramp dispatch the first two Shambles and avoid the many Root Worm traps (T). To the south you will come across another two Shambles guarding a hollowed stump, while continuing east leads to a canyon-like path on the lower level of a chamber, patrolled by two more Shambles. To reach the boss-level Hollowed Stump high above ground at B, you will need an Acrobatics skill of almost 100 and a lot of patience. Jump up the low-hanging root where the path bends and then slowly make your way up it until you are able to jump onto the ledge above. Now jump onto the much thicker root and climb up until you reach the stump. For the most efficient exploration of the next zone, Rotten Den, Sanctum, backtrack a bit and exit this zone through door I rather than nearby door J.
Occupants:
- 4 Shambles
- 2 Shambles (always best possible level)
Treasure:
- 1 boss-level Hollowed Stump (Zealot variety) at location B on map
- 2 Hollowed Stumps (Healing)
- The following plants will always be found: 20 Root Stalk plants
Traps:
- 13 Root Worm traps at location T on map
Doors and Gates:
- There are three doors in/out of this zone
- 1 door (at F) leads to the zone Rotten Den, Precipice
- 2 doors (at I and J) lead to the zone Rotten Den, Sanctum
Zone 5: Rotten Den, Encampment[edit]
As the name suggests, this is zone is the Zealots' living quarters. There are two ways to reach the Encampment: from Rotten Den, Precipice (door G) and Rotten Den, Sanctum (door L). Upon arriving from Sanctum, make your way to main room, looting the Hollowed Amber Limb at H, avoiding two spore pod Traps (T) and dispatching three Zealots along the way. As you arrive at the camp, use your elevated position to snipe at the three Zealots below and prepare yourself for a long battle. Make your way through the camp, which is comprised of six tents and a dining area under a large canopy. Three dead baliwogs are locked up at M and there is a minor loot chest on the far western wall. If you are all done with Rotten Den, retrace your steps and locate door D, which will take you right back to the very first zone, Rotten Den, Deadfall. Otherwise, head up the ramp to the southeast, loot a hollowed stump and enter the Sanctum from door K.
Occupants:
- 2 Zealots
- 4 Zealots (always best possible level)
Treasure:
- 1 Hollowed Amber Limb (1-4 Amber; non-respawning) at location H on map
- 1 Chest (locked)
- 2 Hollowed Stumps (Healing)
- The other following items will always be found: 1 Zealotry and 5 Smoked Baliwog Legs
- The following plants will always be found: 5 Thorn Hook plants, 13 Root Stalk plants, and 11 Withering Moon plants
Traps:
- 2 Spore Pod traps at locations T on map
Doors and Gates:
- There are four doors in/out of this zone
- 1 door (at D) leads to the zone Rotten Den, Deadfall
- 1 door (at G) leads to the zone Rotten Den, Precipice
- 2 doors (at L and K) lead to the zone Rotten Den, Sanctum
Other:
- 3 Dead Young Baliwogs at locations M on map
- 6 bedrolls at b
